“The right tools help you save money!”

For reference: Step by step installation
Installation is as easy as to follow the steps presented to you when you run the ASAP Utilities setup.You can immediately start using ASAP Utilities in Excel.
User Guide
To install ASAP Utilities, follow the steps presented to you when you run the ASAP Utilities setup. The installation is even more detailed described in the User Guide (PDF).Prior to installing
- Just like with most programs it is recommended to close all programs before you run the setup.
- You must either be allowed to install software on your computer or use the non-admin single user setup of the Professional edition (version 7.3+).
- To upgrade, just run the setup of the new version 'on top' of your current installation.
(Do not uninstall a previous version of ASAP Utilities because then all settings will be reset to the default settings, such as your favorite tools menu and your license details have to be re-entered.)
Digital Signature - Verified publisher
The ASAP Utilities setup and add-in files are signed with a digital certificate.This signature provides you with the assurance that, what you are about to use, comes from our company and that it has not been tampered with.
The name of our company is A Must in Every Office BV:

Performing the installation
Step 1
Download the ASAP Utilities Setup and run it.Select the language to use during the installation and choose OK.
You can choose from the following languages 10 for the setup:
- Nederlands (Dutch)
- Português do Brasil (Portuguese (Brazil))
- Русский (Russian)
- 中文(简体) (Chinese (Simplified))
- 日本語 (Japanese)

Step 2
The installation wizard begins and the welcome dialog is displayed. Click on the Next-button to continue.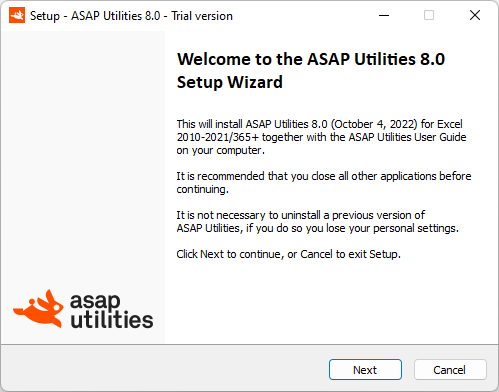
Step 3
Please take time to read the license agreement. If you agree choose "I accept the agreement" and then click on the Next-button. If you disagree with the license terms, choose "I do not accept the agreement". If you do not accept the agreement the installation will be canceled.
Step 4
An information dialog is displayed. Click the Next-button to continue.
Step 5
Select a folder to install ASAP Utilities. We recommend you use the default folder, "C:\Program Files (x86)\ASAP Utilities" or "C:\Program Files\ASAP Utilities\" but any other location can be used too.ASAP Utilities requires approximately 29 MB of disk space.
If you have a previous version of ASAP Utilities installed and are upgrading, then the setup will automatically detect the previously used destination folder.
Click the Next-button to continue.

Step 6
If you want to, then ASAP Utilities can create an entry in your start menu with for example quick access to the PDF User Guide.Click the Next-button to continue.

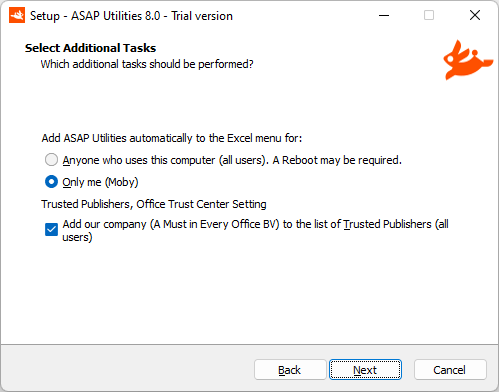
Step 7
Add ASAP Utilities automatically to the Excel menu for:
- Anyone who uses this computer (all users).
If you want the ASAP Utilities menu to be automatically added in Excel for all users on this computer choose "Anyone who uses this computer (all users). A Reboot may be required". Click the Next-button to continue.
This will automatically add ASAP Utilities to the Excel menu for each user that logs in on the computer. This is also handy when you log in with normal user-rights and run the setup as an administrator. This article shows how to manually add ASAP Utilities to the Excel menu if needed.
- Only me
Adds ASAP Utilities only to the Excel menu for this user.
Trusted Publishers, Office Trust Center Setting
During the setup you can have our company (A Must in Every Office BV) automatically added to the List of Trusted Publishers in Excel.Some users have their Excel security settings set to 'only allow macros run by Trusted Publishers', and then this can help. (For reference, Microsoft: Add, remove, or view a trusted publisher)
Step 8
Click "install" to install the files to the selected folder.
The setup program now installs the files on your computer.

Step 9
The Setup is completed. Click the finish button.
Step 10
The installation is finished and you are ready to start using ASAP Utilities.To turn your trial into the full unlimited version, follow step 11.
Depending on the language of your Excel version, ASAP Utilities will appear in one of the following languages:
- Nederlands (Dutch)
- Português do Brasil (Portuguese (Brazil))
- Русский (Russian)
- 中文(简体) (Chinese (Simplified))
- 日本語 (Japanese)
(In the rare situation that you don't see ASAP Utilities in the Excel menu, click here for instructions on how to fix this.)
Excel with ASAP Utilities in the ribbon

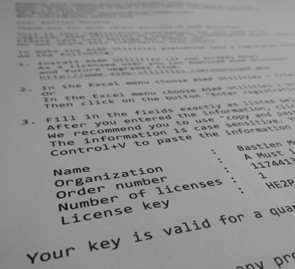
Step 12: Enter your license details
- To turn your copy of ASAP Utilities 8 into a registered version do the following:
In the Excel menu choose ASAP Utilities › ASAP Utilities Options › 3. Enter license...
In case you have ASAP Utilities 7:
In the Excel menu choose the right-bottom button in the ASAP Utilities Tab in Excel. (The button's text is Trial version..., Enter License..., Unregistered version... or Home&Student Edition...).
Then click on the button "Enter registration information".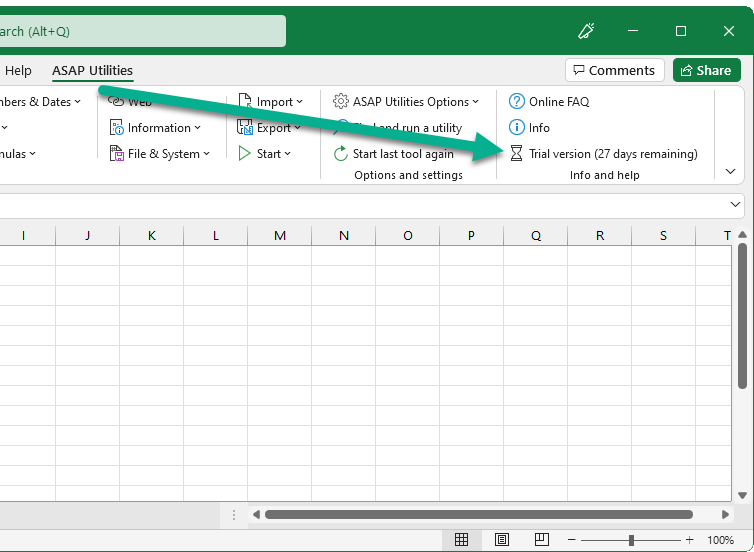
- Fill in all the fields exactly the same as in the email with your full license details.
That also means that the name and organization have to be spelled exactly the same as in the license.
You received two emails after the order was completed. The email from "ASAP Utilities (A Must in Every Office BV)" contains the full license information.
We recommend you to use "copy and paste" to avoid typing errors. The information is case sensitive.
You can use the shortcut Control+V to paste the information in the fields.

Additional help
If you need additional help, then the following can assist you:
©1999-2026 ∙ ASAP Utilities ∙ A Must in Every Office BV ∙ The Netherlands
🏆 Winner of the "Best Microsoft Excel Add-in" Award at the Global Excel Summit 2025 in London!
For over 26 years, ASAP Utilities has helped users worldwide save time and do what Excel alone cannot.
🏆 Winner of the "Best Microsoft Excel Add-in" Award at the Global Excel Summit 2025 in London!
For over 26 years, ASAP Utilities has helped users worldwide save time and do what Excel alone cannot.